The stress-strain curve is one of the first material strength graphs we come across when starting on the journey to study materials.
While it is actually not that difficult, it may look a bit daunting at first. In this article, we shall learn about the stress and strain curve to understand it better.
But before we get there, we will try to explain a few key concepts for better comprehension.
Loading
A metal in service or during manufacturing is subjected to different forces. Depending on the magnitude of these forces, the metal may or may not change its shape.
The act of applying the force is known as loading. There are five different ways in which these forces may be applied on a metal part.
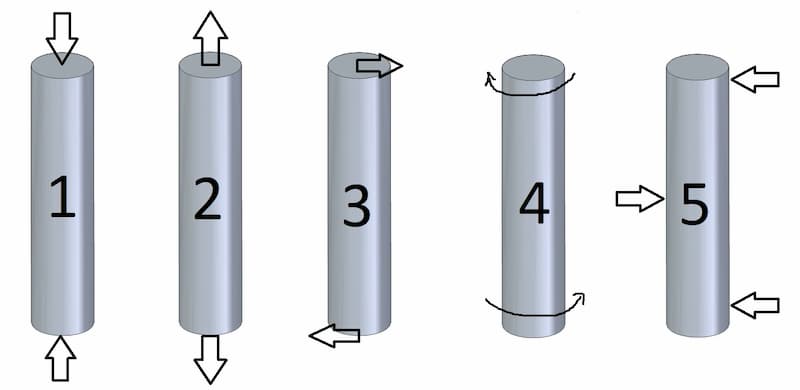
The five forms of loading are:
- Compression
- Tension
- Shear
- Torsion
- Bending
Metals are elastic in nature up to a certain extent. When subjected to loading, the metal undergoes deformation but it may be too small to discern without special tools.
When this applied force is removed, the metal regains its original dimensions (unless the force exceeds a certain point). Just like a balloon, for example, regains its original shape after a force is removed after application.
What Is Stress?
Stress is defined as the ratio of the applied force to the cross-sectional area of the material it is applied to.
The formula for calculating material stress:
σ=F/A, where
F is force (N)
A is area (m2)
σ is stress (N/m2 or Pa)
For example, a force of 1 N applied on a cross-sectional area of 1 m2, will be calculated as a stress of 1 N/m2 or 1 Pa. The unit can be displayed as N/m2 or Pa, both of which represent pressure.
Stress can be understood as an internal force induced in the metal in response to an externally applied force. It will try to resist any change in dimension caused by the external force.
When the cross-sectional area changes, the same force will induce greater or smaller stresses in the metal. A smaller cross-sectional area will result in a larger stress value and vice versa.
What Is Strain?
Strain is defined as the ratio of the change in dimension to the initial dimension of the metal. It does not have a unit.
There are three types of strain: normal, volumetric, and shear.
Normal strain (or longitudinal strain) concerns itself with the change in only one dimension, say length for example.
The formula for calculating strain is:
ε=(l-l0)/l0, where
l0 is starting or initial length (mm)
l is stretched length (mm)
For example, if a certain force changes a metal’s length from 100 mm to 101 mm, the normal strain will be (101-100)/100 or 0.01.
Normal strain may be positive or negative depending on the external force’s directions and therefore effect on the original length.
For the sake of simplicity, we shall only talk about normal strain in our article. Thus, every time we use the word strain, it will refer to normal strain. Once we understand normal strain, it is easy to extend the same understanding to the other two.
Stress and Strain
Whenever a load acts on a body, it produces stress as well as strain in the material.
Let’s use a football as an example. When you try to squeeze it, it offers resistance. The resistance offered is the induced stress while the change in dimension represents the strain.
Strain causes stress. When applying force that leads to deformation, a material tries to retain its body structure by setting up internal stresses.
How Is a Stress-Strain Curve Plotted?
The most common method for plotting a stress and strain curve is to subject a rod of the test piece to a tensile test.
This is done using a Universal Testing Machine. It has two claws that hold the two extremes of the rod and pull it at a uniform rate.
The force applied and the strain produced is recorded until a fracture occurs. The two parameters are then plotted on an X-Y graph to get the familiar graph.
Stress-Strain Curve
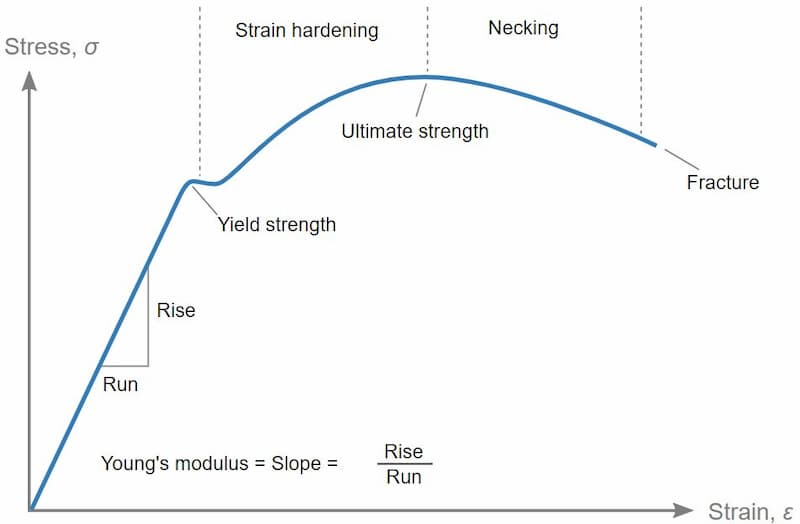
The stress-strain curve is a graph that shows the change in stress as strain increases. It is a widely used reference graph for metals in material science and manufacturing.
There are various sections on the stress and strain curve that describe different behaviour of a ductile material depending on the amount of stress induced.
ARVE error: url: https://www.googleapis.com/youtube/v3/videos?part=snippet%2Cstatistics&id=hD_NJaZIpT0&key=AIzaSyAQ7WFzTAUrOX-FjsIrFS3JwZBFzgIvloc Status code 200 expected but was 403.
Stress and strain curves for brittle, hard (but not ductile) and plastic materials are different. The curve for these materials is simpler and can be learned very easily. We shall focus on the stress-strain curve of ductile materials. But before we delve deeper into that, let’s take a look at another important concept – Hooke’s law.
Hooke’s Law
This principle of physics talks about elasticity and how the force required to extend or compress an elastic object by a certain distance is proportional to that distance. More force produces more distance.
Hooke’s law formula for calculating the force in springs:
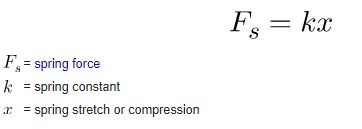
In the case of metals, Hooke’s law dictates that for most metals, greater changes in length will create greater internal forces. That means stress is directly proportional to strain. This is because metals exhibit elasticity up to a certain limit.
In simple words, if the tensile/compressive load is doubled, the increase/decrease in length will also double as long as the metal is within the proportional limit.
- Personal account manager
- Quality assurance
- Payment terms for companies
- On-time delivery by Fractory
Proportional Limit
Almost all metals behave like elastic objects over a specific range. This range varies for different metals and is affected by factors such as mechanical properties, atmospheric exposure (corrosion), grain size, heat treatment, and working temperature.
When the testing machine starts pulling on the test piece, it undergoes tensile stress. Initially, the material follows Hooke’s law.
The strain will be proportional to stress. It means that the ratio of stress to strain will is a constant. In material science, this constant is known as Young’s modulus of elasticity and is one of the most important mechanical properties to consider when choosing the right material for an application.
There is no permanent deformation either. The metal will behave like a spring and return to its original dimension on the removal of load.
The point up to which this proportional behaviour is observed is known as the proportional limit. With increasing stress, strain increases linearly. In the diagram above, this rule applies up until the yields strength indicator.
Young’s Modulus of Elasticity
It is defined as the ratio of longitudinal stress to strain within the proportional limit of a material. Also known as the modulus of resilience, it is analogous to the stiffness of a spring. That’s also why Hooke’s law includes a spring constant.
Let’s say we have 2 materials with the same length and cross-section. To change the dimensions in equal measure, the material with a higher Young’s modulus value requires greater force.
Elastic Point & Yield Point
As the test piece is subjected to increasing amounts of tensile force, stresses increase beyond the proportional limit.
The stress-strain relationship deviates from Hooke’s law. The strain increases at a faster rate than stress which manifests itself as a mild flattening of the curve in the stress and strain graph.
This is the part of the graph where the first curve starts but has not yet taken a turn downwards. Although the proportionality of stress to strain is lost, the property of elasticity isn’t, and on the removal of load, the metal will still return to its original dimensions.
The change in dimension within the elastic limit is thus temporary and reversible. The elastic limit of a material ascertains its stability under stress.
Here lies the reason why engineering calculations use a material’s yield strength for determining its ability to resist a load. If the load is greater than the yield strength, the result will be unwanted plastic deformation.
Plastic Behaviour
When the test piece is pulled further on the testing machine, the property of elasticity is lost. This aligns with the start of the strain hardening region in the stress-strain graph.
The yield strength point is where the plastic deformation of the material is first observed. If the material is unclamped from the testing machine beyond this point, it will not return to its original length.
Strain hardening is said to occur when the number of dislocations in the material becomes too high and they start to obstruct each other’s movement. The material constantly rearranges itself and tends to harden.
Necking
The plastic deformation continues to occur with increasing stress. In due time, a narrowing of the cross-section will be observed at a point on the rod. This phenomenon is known as necking. The stress is so high that it leads to the formation of a neck at the weakest point of the rod. You can see this happen in the video above.
The stress-strain curve also shows the region where necking occurs. Its starting point also gives us the ultimate tensile strength of a material.
Ultimate tensile strength shows the maximum amount of stress a material can handle. Reaching this value pushes the material towards failure and breaking.
Fracture
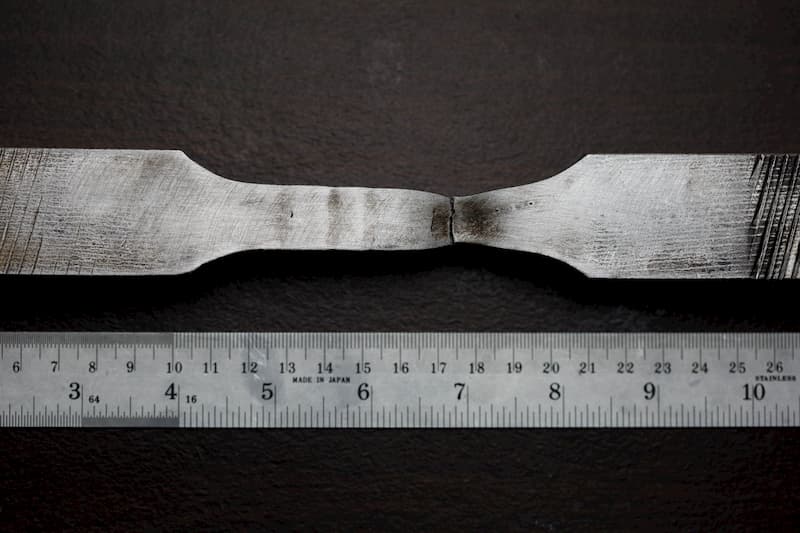
Once in the necking region, we can see that the load does not have to increase for further plastic deformation.
A fracture will occur at the neck usually with a cup and cone shape formation at either end of the rod. This point is known as the fracture or rupture point and is denoted by E on the stress and strain graph.
Why Is the Strain-Stress Curve Important?
The stress-strain curve provides design engineers with a long list of important parameters needed for application design. A stress-strain graph gives us many mechanical properties such as strength, toughness, elasticity, yield point, strain energy, resilience, and elongation during load.
It also helps in fabrication. Whether you are looking to perform extrusion, rolling, bending or some other operation, the values stemming from this graph will help you to determine the forces necessary to induce plastic deformation.


